Showing posts with label power. Show all posts

Tuesday, July 24, 2012

The Revival Project: The Overhaul

In a previous post ( http://tomhuang03.blogspot.com/2012/06/amd-duron-850mhz-spitfire-my-first.html ), I discussed my very first overclocking attempt using my old rig. I mentioned that I will be gathering benchmarking tools and run some tests on the said system, I now have those tools, however, I encountered a problem with my old system. I tried powering it up and the Hard Disk Drive was no longer recognized by the motherboard or in the BIOS. My first thought was to blame the Hard Disk Drive (Seagate 40GB IDE) so I decided to isolate, I bought a Hard Disk enclosure (IDE to USB interface) and tested it on my laptop, the Hard Disk reads without any hiccups, therefore I concluded that it isn't the Hard Drive, I switched IDE Cables as well and the motherboard still won't recognize it, therefore, I have come to the conclusion that the failure comes from the motherboard itself, the IDE port is no longer functioning. To resolve the issue, I went in search of a Socket A 462 Motherboard. This was no easy task as this type of hardware is about 10 years old already. But fortunately enough, using a Philippines based website called TipidPC.com, I posted what I needed at the Want To Buy section and luckily, I was able to receive a text message offering a secondhand motherboard, an MSI KM2M Combo motherboard for 900 bucks (PhP).


Now the "surgery" begins.

(AMD Duron 850 and heatsink, Photo by Thomas Joseph C. Huang)
(CPU with new Thermal Paste, Photo by Thomas Joseph C. Huang)
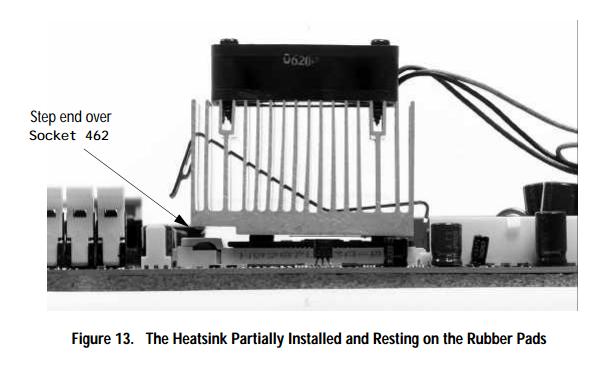
(Proper Alignment, photo taken from AMD Support Website)
First off, I made sure that nothing was connected to any power wall outlets. After, I made sure to touch my set of dumbbells to discharge any static electricity (I wear a silver bracelet, but better safe than sorry.) then I proceeded to removing the side panel of the case. After removing all the cables connected the motherboard, I unmounted the PSU because it was in the way of getting to the CPU area of the motherboard. After setting the PSU aside, I freed the CPU cooler (standard heatsink with fan) and set that aside, after which, unclamped the CPU and removed the processor and set that aside too. Looking at the processor and the heatsink fan, it was covered in dust and the used thermal paste. I cleaned off the dust using rubbing alcohol and cotton buds, I repeated this process until the bottom of the Heat sink and the top of the CPU were free from thermal paste. I also cleaned off all the dust on the heatsink and the fan. Once cleaned, I mounted the processor onto the socket of the new motherboard. Then I put some new thermal paste, about the size of a grain of rice onto the center of the CPU chip (the small square in the middle of the bigger square). I used Deep Cool Z3 thermal paste, it's priced quite cheaply and works well in terms of thermal conductivity that aids in heat dissipation and comes in the easy to use syringe. Once the new thermal paste was applied, I then reattached the heatsink and fan. Just a little tip when reattaching the heatsink, you need to make sure that the the alignment is correct, meaning that the stepped area on the base of the heatsink is properly aligned with the socket. (refer to the photo labeled Proper Alignement, taken from http://support.amd.com/us/Processor_TechDocs/23986.pdf), you may also need to use a flat head screwdriver to ease the the heatsink clip into place, by using this method, you don't apply any direct force onto the CPU which may cause damage.
(CPU in place, Photo by Thomas Joseph C. Huang) 


Now that CPU is in place, I inserted the PC133 RAM into the RAM slot, then I connected all the necessary wires to their corresponding locations on the motherboard. I also connected the hard disk drive to the corresponding IDE port on the motherboard as well.


(All wired in, Photo by Thomas Joseph C. Huang)
Now that everything is in place, I plugged in the power supply to the wall socket and turned on the monitor. Then, the moment of truth! I pushed the power button.


Nothing. Happened. No beeps. No monitor display output. I double checked all the wiring connections, checked the internet for some troubleshooting tips and asked a few friends for advice as well.


Apparently, due to my excitement, I hadn't noticed that the current power supply (it's a generic one, a mere 235w PSU) I was using didn't have the 4-pin 12v power connector, it seems that the previous motherboard I was using didn't require this connector to power up the CPU, hence it's absence. This board is of "newer technology" so to speak. So I thought of a quick solution, find another generic power supply unit that is equipped with a 4-pin 12v power connector. And luckily, I found one from one of the stores (PCNetmiles to be exact) I mentioned in part 2 of the Getting My Nerd On series, as usual, a quick and hassle free transaction yielded me to purchasing a generic 600w PSU for 590 bucks (PhP). I also stopped by another store for 2pcs of 256MB PC133 RAM (secondhand) to replace the current 128MB PC133 RAM, I got these at a price of PhP280 for both. Not a bad way to spend 870 bucks (PhP).

Unfortunately, I got a lemon when it came to the PSU I first bought, it wouldn't power up at all. Tried unwiring and rewiring and on a different motherboard and still no power. But PCNetmiles is a very reasonable shop and replaced the PSU right away, no questions asked. However, there seems to be a deeper issue. After being all wired in, I proceeded with turning on the PC. CPU fan spun normally, hard drive was running as well, but all I got was a gray-like display on the screen, but nothing else. No beeps either, despite having the system speaker front panel connector in place. I searched the net and found this nice checklist from Tom's Hardware (see link below), I will run through it and see if the problem gets resolved throughout any point of the list.

Link: http://www.tomshardware.com/forum/261145-31-perform-steps-posting-post-boot-video-problems

Hope that somewhere through this checklist, the problem will be resolved.

Saturday, July 14, 2012

Getting My Nerd On (Part 2.1)

A couple of days ago, I was able to sell my old mobile phone (HTC Wildfire) for a fairly good price given it's condition and age. With the funds earned from this, I took out my PC Rig Checklist and took a look at which part I could purchase with the funds that I have. I decided to go with the Power Supply Unit (PSU). I sent out the necessary inquiries to the stores of my choice and was able to get one reserved from the shop I bought my Motherboard from mentioned in Part 2 (http://tomhuang03.blogspot.com/2012/06/getting-my-nerd-on-part-2.html). Now the Power Supply Unit is an important part when building a rig because as the name suggests, this is where you would get the supply of power for all the components of your rig. Simply put, PSU = Power for your machine! But to delve a little deeper, the main function of the Power Supply Unit is to convert the high voltage from the wall outlet into lower voltages that are required by each component of your system. If this voltage conversion is done improperly, it can cause damage to your components and/or system instability. Hence the importance of choosing a PSU that meets the needs of your setup. One of the things to consider are the components that draw the most power, in most cases, it would be the CPU and the GPU. But the PSU generally brings to life the whole system once everything has been put together.

I have selected, I chose the AeroCool Strike X 1100w 80 Plus Gold Modular Power Supply Unit. I will not go into extreme detail about this item but for more information you may refer to the website: http://www.aerocool.com.tw/index.php/products/strike-x/47-strike-x-power/137-strike-x-power-1100w

But rest assured, this PSU has enough juice to power the current setup I have mapped out as well as leave pretty decent headroom for future upgrades and for a price that isn't too shabby either. The main highlights of this product in my opinion are as follows:

(Photo by Thomas Joseph Huang)
1. High Efficiency Rating: (80 Plus Gold)
2. High Reliability: 120,000 hours MTBF (Mean Time Between Failures)
3. High capacity power output: 1,100watts
4. Over Current, Over Voltage, Over Wattage, Over Temperature and Short Circuit Protections in place.


Now I know that this is a whole lot of power and you might be thinking, what am I to do with all of this? As mentioned, I like to leave decent headroom for future upgrades as well as future-proofing my rig. I'd like to be overpowered than underpowered, better to be over prepared than caught off guard.


We'll see how well it performs once the rig is completed.


Thank you PCNetmiles (Eton Cyberpod) for the quick and hassle free transaction!

Stay tuned for the continuation of Phase 2 of the Hardware shopping step (Step 2.2)!


For Part 1, check it here: http://tomhuang03.blogspot.com/2012/06/getting-my-nerd-on-part-1.html
For Part 2, check it here: http://tomhuang03.blogspot.com/2012/06/getting-my-nerd-on-part-2.html