Showing posts with label motherboard. Show all posts

Tuesday, July 24, 2012

The Revival Project: The Overhaul

In a previous post ( http://tomhuang03.blogspot.com/2012/06/amd-duron-850mhz-spitfire-my-first.html ), I discussed my very first overclocking attempt using my old rig. I mentioned that I will be gathering benchmarking tools and run some tests on the said system, I now have those tools, however, I encountered a problem with my old system. I tried powering it up and the Hard Disk Drive was no longer recognized by the motherboard or in the BIOS. My first thought was to blame the Hard Disk Drive (Seagate 40GB IDE) so I decided to isolate, I bought a Hard Disk enclosure (IDE to USB interface) and tested it on my laptop, the Hard Disk reads without any hiccups, therefore I concluded that it isn't the Hard Drive, I switched IDE Cables as well and the motherboard still won't recognize it, therefore, I have come to the conclusion that the failure comes from the motherboard itself, the IDE port is no longer functioning. To resolve the issue, I went in search of a Socket A 462 Motherboard. This was no easy task as this type of hardware is about 10 years old already. But fortunately enough, using a Philippines based website called TipidPC.com, I posted what I needed at the Want To Buy section and luckily, I was able to receive a text message offering a secondhand motherboard, an MSI KM2M Combo motherboard for 900 bucks (PhP).


Now the "surgery" begins.

(AMD Duron 850 and heatsink, Photo by Thomas Joseph C. Huang)
(CPU with new Thermal Paste, Photo by Thomas Joseph C. Huang)
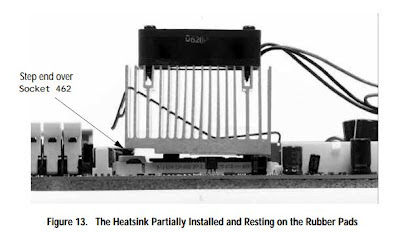
(Proper Alignment, photo taken from AMD Support Website)
First off, I made sure that nothing was connected to any power wall outlets. After, I made sure to touch my set of dumbbells to discharge any static electricity (I wear a silver bracelet, but better safe than sorry.) then I proceeded to removing the side panel of the case. After removing all the cables connected the motherboard, I unmounted the PSU because it was in the way of getting to the CPU area of the motherboard. After setting the PSU aside, I freed the CPU cooler (standard heatsink with fan) and set that aside, after which, unclamped the CPU and removed the processor and set that aside too. Looking at the processor and the heatsink fan, it was covered in dust and the used thermal paste. I cleaned off the dust using rubbing alcohol and cotton buds, I repeated this process until the bottom of the Heat sink and the top of the CPU were free from thermal paste. I also cleaned off all the dust on the heatsink and the fan. Once cleaned, I mounted the processor onto the socket of the new motherboard. Then I put some new thermal paste, about the size of a grain of rice onto the center of the CPU chip (the small square in the middle of the bigger square). I used Deep Cool Z3 thermal paste, it's priced quite cheaply and works well in terms of thermal conductivity that aids in heat dissipation and comes in the easy to use syringe. Once the new thermal paste was applied, I then reattached the heatsink and fan. Just a little tip when reattaching the heatsink, you need to make sure that the the alignment is correct, meaning that the stepped area on the base of the heatsink is properly aligned with the socket. (refer to the photo labeled Proper Alignement, taken from http://support.amd.com/us/Processor_TechDocs/23986.pdf), you may also need to use a flat head screwdriver to ease the the heatsink clip into place, by using this method, you don't apply any direct force onto the CPU which may cause damage.
(CPU in place, Photo by Thomas Joseph C. Huang) 


Now that CPU is in place, I inserted the PC133 RAM into the RAM slot, then I connected all the necessary wires to their corresponding locations on the motherboard. I also connected the hard disk drive to the corresponding IDE port on the motherboard as well.


(All wired in, Photo by Thomas Joseph C. Huang)
Now that everything is in place, I plugged in the power supply to the wall socket and turned on the monitor. Then, the moment of truth! I pushed the power button.


Nothing. Happened. No beeps. No monitor display output. I double checked all the wiring connections, checked the internet for some troubleshooting tips and asked a few friends for advice as well.


Apparently, due to my excitement, I hadn't noticed that the current power supply (it's a generic one, a mere 235w PSU) I was using didn't have the 4-pin 12v power connector, it seems that the previous motherboard I was using didn't require this connector to power up the CPU, hence it's absence. This board is of "newer technology" so to speak. So I thought of a quick solution, find another generic power supply unit that is equipped with a 4-pin 12v power connector. And luckily, I found one from one of the stores (PCNetmiles to be exact) I mentioned in part 2 of the Getting My Nerd On series, as usual, a quick and hassle free transaction yielded me to purchasing a generic 600w PSU for 590 bucks (PhP). I also stopped by another store for 2pcs of 256MB PC133 RAM (secondhand) to replace the current 128MB PC133 RAM, I got these at a price of PhP280 for both. Not a bad way to spend 870 bucks (PhP).

Unfortunately, I got a lemon when it came to the PSU I first bought, it wouldn't power up at all. Tried unwiring and rewiring and on a different motherboard and still no power. But PCNetmiles is a very reasonable shop and replaced the PSU right away, no questions asked. However, there seems to be a deeper issue. After being all wired in, I proceeded with turning on the PC. CPU fan spun normally, hard drive was running as well, but all I got was a gray-like display on the screen, but nothing else. No beeps either, despite having the system speaker front panel connector in place. I searched the net and found this nice checklist from Tom's Hardware (see link below), I will run through it and see if the problem gets resolved throughout any point of the list.

Link: http://www.tomshardware.com/forum/261145-31-perform-steps-posting-post-boot-video-problems

Hope that somewhere through this checklist, the problem will be resolved.

Tuesday, June 19, 2012

Getting My Nerd On (Part 2)

Now this is where the fun begins. Step 2. Hardware shopping.


(Gilmore IT Center, Photo courtesy of Janine Lyn David)
For my first shopping trip, I invited two of my friends (Martin and Fred) to come join me in my quest. We met at my apartment for some strategic planning and final blueprinting as well as going over a checklist I had put together. After some tweaking and fine tuning, we decided to pay a visit to a known computer parts zone near in a city about 30 minutes from where I live. This place is called Gilmore IT Center, they have a multitude of shops located in the area, it's basically like a shopping mall for anything related to computers.


We stormed the place, checklist in hand, cash in my pocket.


Like I mentioned in Part 1, I went in search of what I consider the main organs of the rig first. My initial checklist for these two pieces of hardware were as follows: an AMD Phenom II X4 960T Black Edition for the CPU.


This actually changed as we scoped out all the shops in the zone. The processor I was initially looking for was no longer available, apparently, these processors are already being phased out to make room for the newer FX series aka "Bulldozer" processors of AMD. This was something I initially missed out during the intelligence gathering phase which caused me to make adjustments on the spot. But I suppose this was bittersweet, after asking all the stores, apparently the Phenom II X4 960T Black Edition was no longer available on the market. All hope seemed lost but I went back to 1 store that had very knoweldgeable salespersons and they said they had 1 piece remaining for an AMD Phenom II X6 1100T Black Edition. I said I would come back after doing a quick check of it's specifications and canvassing around in other shops (one shop actually used the same item from store I previously went to and tried to raise the price on me!), I finally decided to go back and take the last piece from the very first store I had checked.


The processor I have selected is the AMD Phenom II X6 1100T Black Edition, it is a 3.3GHz Hexa Core CPU, I won't go into deep detail since everyone reading this probably has access to the AMD website anyway. :] Unfortunately though, I went over budget for this one because I had to shell out a little more cash for the processor I chose since the original one was no longer available. I had to sacrifice purchasing my Motherboard on that same trip which was the original plan because I went over budget, but for a well worth it purchase I think. 
Eton Cyberpod Corinthian (Photo courtesy of Janine Lyn David)


Now for the Motherboard, I had originally chosen the ASRock 970 Extreme 4, and to avoid the "on the spot" adjustment, I decided to give the target shops a call to check on the availability of the Motherboard, and it's a good thing I did the day before because upon asking about the availability of this item, I have been informed that shipping is apparently on hold for this item with uncertainty of when it will be available. (I think it's just bad luck for me!) So I had to adjust again (at least I had a 1 day buffer to really think and do ample research on the adjustment I'm going to make) and I ended up choosing the ASRock 990FX Extreme3, it's about 900 bucks (Philippine Pesos) more than the original board of my choice which isn't so bad. Again I won't go into deep detail for this, just a side note, it's an ATX form factor board (I mentioned this here because this will come into play when choosing a Casing/Chassis, another tip I learned just recently). This is my second round buying parts, I brought my girlfriend with me for this trip (yes, she is that supportive. :D) this time, we head to another location known for composed of stores that sell PC Hardware which is called Eton Cyberpod. This location is nearer than the first place I went to, it's about 10 minutes from where I live and I made sure to reserve the item beforehand to ensure item availability, it took me just 10 worry-free and hassle-free minutes to make the purchase.


As of this moment, I have completed what I consider the main parts of my rig. Now it's on to Phase 2. To be honest, I'm not too sure what Phase 2 would consist of, but rest assured my mental gears are turning to identify these. My rig build checklist is pretty much set but of course, I have left room for variables such as part unavailability (this seems to be quite common.) and price hikes/drops.


ASRock 990 FX Extreme3 (Photo courtesy of Janine Lyn David)
Thank you to PCNetmiles (Eton Cyberpod Corinthian) for my Motherboard and CKY Planet PC (GIlmore IT Center) for my Processor!


AMD Phenom II X6 1100T Black Edition (Photo by Thomas Joseph Huang)

Stay tuned for the next part of my series which is Phase 2 of the Hardware shopping step (Step 2).


For Part 1: Check it here: http://tomhuang03.blogspot.com/2012/06/getting-my-nerd-on-part-1.html

Wednesday, June 6, 2012

Getting My Nerd On (Part 1)


A few weeks ago, my trusty MSI EX 460 laptop was called into Silicon Valley Heaven. It was a sad day. From getting me through some school work, to passing the time, to daily activities, to a 24 hour LAN party with friends, this laptop has been through a lot with me. I suppose you could say it served it's purpose quite well. What added to the sadness is that I now have to resort to using my iPhone 4S (which isn't a bad thing, except for the small screen size) as well the office laptop (an old Dell Latitude D630) at home for my daily activities. This sparked a thought, "Why not go back to the Grade School and High School days? Why not build my own PC rig?" and this led to me "Getting My Nerd On".


Ever since I was about 14 years old, I've always had a fascination with technology, tinkering with it, taking it apart and putting it back or simply taking it apart and appreciating all the details (also because there were times when I couldn't put it back together. -_-).  With that being said, I guess it was only a matter of time before I got back into it. And since I have decided to build my rig from scratch, that childlike excitement got renewed in me. 


And this is where my quest begins.


Step zero. Goal setting. Begin with the end in mind. My goal is to build a mid-performance, mid-budget rig. This may be a subjective category though.


Step one. Due diligence. Researching like a beast. Reading specifications. Reading reviews. Watching reviews. Comparing reviews. Comparing parts. Window shopping. It's a very tedious process, but it is a necessary evil. It could also save you a bunch of money if you look well enough. Because in the technological world, things aren't always what they seem, faster is not always better, more expensive is not always the best. This was the simple advice from Martin, a very good friend of mine who has ample experience in rig building.


The first thing I gathered intelligence for was to find the main organs of the rig. The Central Processing Unit (CPU) and the Motherboard. Finding these is like preparing for marriage, the two need to be compatible or else there will be problems. The first piece I looked for was the CPU and the motherboard. Something I learned recently (courtesy of Martin) was the wattage capacity of the Motherboard (e.g. Processor Thermal Design Power (TDP) is 125w, Motherboard only supports 95w). I had no idea about this and it would have become an issue if I hadn't gotten this tip. This certainly helped me narrow my searches for parts.


This will serve as the first part of the series I will be putting together as I progress through my build.


Stay tuned for the next part when I begin purchasing the hardware!