Tuesday, October 23, 2012

Dishonored Video Game Review (PC)


10/15/2012

(Photo by Thomas Joseph C. Huang)
When I arrived at work today, I saw a package with a Post-It note on it, it was from my girlfriend! When I opened the package, there it was, Dishonored for the PC! She is awesome! :]

I have heard a lot about this game and I've watched a lot of YouTube videos of it as well and this added to my excitement of the game, because the concept is something that I personally like, it's played from the first-person perspective and emphasizes on gamer choice, each mission can be carried out in either a stealthy approach, a head on kill everyone approach or a combination of both, each choice of approach merits a different outcome which ultimately affects how the story plays out.


The game takes place in a fictional city called Dunwall which reminds me of how London looked during the classical era. You are Corvo Attano, the bad ass bodyguard of the Empress of Dunwall that becomes the fall guy when she is murdered which drives you to become an assassin and seek out those who conspired against you and exact your vengeance upon them, you must also seek out and find her kidnapped daughter. But you are no ordinary assassin, you are empowered by a foreign entity that gives you magical abilities to help you on your quest.

(Maxed Out Settings)


(Maxed Out Settings)
Installing the game was a breeze, if you've ever played Modern Warfare or any game that works with Steam then this should shorten your installation process. In my case, I hadn't installed Steam on my rig yet, so I had a lengthier installation time, approximately a total time of 15 minutes. Once installed, you will have a simple introduction of all the folks that contributed to the development of the game and then you are brought to the main menu, a simple and straightforward menu. First tab I went to was the Graphics tab, since I also wanted the game to test my system, I maxed out the settings. I decided to select FXAA instead of the MLAA because I wanted to give the new Anti Aliasing technology a shot as it is supposedly better but I've never played a game that uses FXAA so I decided to give it a shot, most games I played use MLAA or MSAA.


(Light and Shadow Details)
After finalizing the graphics settings, I decided to start a new game, selected my difficulty and off we go. The game starts out in a beautiful sea setting as Corvo is on a boat on his way to Dunwall. You get to look around and observe your surroundings, so I made the most of it and did look around, left, right, behind me then up and down. I had FRAPS running so I took the liberty of taking some photographs of my boat ride to Dunwall. The detail of the environment is very well created and I was quite impressed at the lighting, shadow and reflection details that the game has to offer so far. 


(Yes, that is a whale.)
Since I am not a big fan of spoilers, I will not go heavily into the story. But I will touch on how malleable this game can be. This is actually the heart of the game, there is a certain connection that is developed between the gamer, the character and the story. Every gamer has his or her own style of play, but one can never truly apply that due to story restrictions and whatnot, only a few games allow this kind of freedom and this freedom returns in the form of Dishonored. As I mentioned earlier, the game emphasized gamer choice. Each choice directly affects your current mission and subsequently affects future ones as well. You have the freedom to rip through each level, but this will cause Chaos which is the somewhat like the stars you get in Grand Theft Auto but in this case, it doesn't decrease. More chaos means more guards, more rats (You'll get it when you play the game, trust me.) and increasingly more difficult missions and a darker ending. Or you can choose to go stealth mode and hold back the urge of just killing your way through missions, this is challenging, but possible and yields in longer playing time but easier succeeding missions, and results in a lighter ending. Or you could go with a balance of both choices. The point I'm trying to make is you can play this game on pure emotion, impulse or simply based on how you feel at the time that you're playing.
(Dual Wield = More Fun!)

The controls are quite simple whether you play it using your keyboard and mouse or the a controller which is supported by the game. As you progress through the game, you will be placed in scenarios wherein you get to familiarize yourself with the controls. I'm using the keyboard and mouse combo so it takes a little getting used to, but nothing you can't pick up quickly. Corvo is pretty much an all offense character, built to adapt the killing machine approach or the stealth approach depending on the gamer's playing style. He utilizes both hands as tools. The left hand is used to wield projectile or ranged weapons as well as his supernatural powers and the right hand is used to wield his sword for melee attacks. The combat sequences are quite straightforward but leaves you enough room to get creative depending on how you play. The game may seem huge in scale, but in reality, what gives the levels scale is the presence of multiple opportunities to complete levels and solve problems that arise, no matter what your style of play is.


For every obstacle you encounter there are at least three or four ways to overcome it. For every locked door, there's likely a balcony up high you can Blink to, or a gutter down below that can be accessed by a possessed rat. Now this game is starting to sound like you are almighty but the developers put a balance to counteract the abuse of your supernatural powers and skills, your health and mana do not regenerate. In order to regenerate these, you need to use health and mana potions which can be purchased from a specific person but will deny you the chance of gear upgrades or can be picked up around the levels, but they are scarce resources. But fret not, you have the quick save anywhere option (except during combat) which allows you to experiment various ways to resolve a specific issue, making every bullet and supernatural power count.


(Heads will roll, pun intended.)
There is a certain aspect of the game that is very reminiscent of the Splinter Cell games, not just the stealth aspect. But the fact that you have a lethal and non-lethal approach to enemies, as well as a variety of choices in terms of hiding or disposing the bodies of your foes so as not to alert suspicion. You also have the ability to pick up certain items and throw them to create distractions or divert the attention of enemies in order for you to either go about your business undetected or set them up for a killing spree. Another thing that I enjoy with this game is the gore (sadistic, I know.), I like blood and gore because it adds realism (although sometimes exaggerated, I'm not complaining >:]) to the game. Dishonored is no stranger to this, which adds to the overall awesomeness of the game.

Due to the many choices you can make and options presented to  you, the game is easily replayable, many many times.

If I say anymore, I would definitely spoil the game, so go out and grab a copy and experience the the epicness for yourself!

Here are few a screenshots to help you see the graphical greatness that this game has to offer.


(Shadow Details.)

(Shadow Details.)

(Where's your head at?)

(Don't go swimming.)

(Environment Effects.)

(Smoke Effects.)

(The Outsider.)

(Blink.)

(Sunrise.)

(What better way to get your point across?)

(Headless.)
(Corvo's Ink.)
Ranking:

Story: 10/10
Gameplay: 10/10
Graphics: 9/10
Soundtrack: 7/10


_____________
The Wraith:

CPU: AMD Phenom II X6 1100T Black Edition
Motherboard: ASRock 990FX Extreme3
GPU: Sapphire HD 6870
RAM: G. Skill Sniper (16GB)
HDD: Western Digital 1TB Caviar Black
PSU: AeroCool Strike X 1,100w 80 Plus Gold Modular
Case: Antec LanBoy Air


Monitor: Viewsonic 24" VX2439WM 1920x1080 Full HD
Sound System: Creative Inspire 5.1 A500 SBS Surround Sound System


Wednesday, September 5, 2012

Getting My Nerd On (Part 3)

(Laying It All Out, Photo By Thomas Joseph C. Huang)
Finally, the long wait is over! All the pieces are in possession and it's time to build! For this, I have asked my good friend Martin to come over and help oversee the operation as he has more experience than I do. I've laid out all the parts in preparation for the assembly, that's the first step, getting organized.

(The Mounted Phenom II X6, Photo by Thomas Joseph C. Huang)
Now we move onto the second step, the preparation phase. The first item to prep is the Motherboard, before laying it out, I took about 4 pieces of my rubber mats that I use for grappling and stacked them, I chose these because they are non conductive materials, but for added safety, I left the small foam lining that helped store the Motherboard and laid that out on the mats, on top of the Motherboard box, before touching the Motherboard, I made sure to grasp a hold of a metal surface in order to discharge any static electricity I may have, I have silver bracelet on but I just wanted to be extra cautious, I also made sure I handled the Motherboard by it's corners. After placing the board on the laid out surface, I opened up the processor socket latch to prepare for the mounting of the processor. I unboxed the processor and repeated the static discharge action on the metal leg of my table before removing the processor from it's plastic casing. I then proceeded to line it up correctly onto the socket before securing it in place with the latch. After which, I attached the heatsink fan onto the processor and locked the mount into place. The next component I mounted were the RAM modules. These are fairly easy to do, so long as you line them up correctly and make sure they lock into place. 
(All Lined Up, Photo by Thomas Joseph C. Huang)


(Motherboard Secure On Tray, Photo by Thomas Joseph C. Huang)
The next step was to unscrew and unmount the motherboard tray, I removed the Power Supply cage as well, this may not be possible with all cases but in my case, I am using the Antec LanBoy Air, which is considered to be one of the most modular and most customizable of cases to date. In order to do this, you must first remove all panels of the case, this will make it easier to get all the cable management and wiring done once you've mounted the motherboard onto the case. After unmounting the motherboard tray, the motherboard is placed on top of the tray, making sure the slots on the board are lined up with the standoffs on the tray. Once these are aligned, the necessary screws can be placed and tightened, securing the motherboard onto the tray.

(Mounted Video Card, Photo by Thomas Joseph C. Huang)
The next item I mounted was the video card. Making sure that it was lined properly on the correct PCI-e slot. This may require you to wiggle it until it clicks into place. It will feel loose and a bit wobbly at first which may be freaky but then it will be secured once you line it up onto the case and add more screws to secure it's position.


(The PSU, Photo by Thomas Joseph C. Huang)
The next item that I focused on is the Power Supply Unit or PSU. As mentioned above, the case I am using is built to be very modular and customizable and in this particular situation, it is possible to have the PSU mounted on top or on the bottom, I opted to go with the bottom mounted setup to keep things simple so that my hardware isn't at risk in the weird event that the PSU falls from the top, destroying everything in it's path, in this case, that would be everything attached to my motherboard which is not a good thing. I'm exaggerating of course, but you really can't tell. So better safe than sorry. To mount the PSU, you need to slide it into the provided PSU cage and then this will allow you to slide it back onto the case via the rack that is a part of the case. The orientation of the PSU is up to your personal preference, orientation meaning the fan facing up (showing off the Strike X design which is the cage covering the exhaust of the PSU) or facing down. I decided to go with the orientation having the fan facing down because it's never a good thing to have hot air blowing upward onto the rest of your hardware like your video card and CPU.


(All Mounted, Photo by Thomas Joseph C. Huang)
Now that everything is where it should be in terms of the motherboard, it is time to put it back into the case. Carefully, the motherboard tray is slid into place using the rails on the case. I had to ask my friend to support the video card as I was sliding the tray back because I was paranoid that it might somehow detach itself and fall off, thankfully it didn't. After the motherboard tray was secured into place, the PSU cage with the PSU was next to follow and secured. After it was in place, the next move would be to secure the back panel of the case, but before doing so, the stock I/O Shield was removed and replaced with the one that came with the motherboard. I also removed the 2nd and 3rd PCI slot covers on the back panel of the case in order to accommodate the ports of the video card. 


(The Mounted Optical Drive, Photo by of Thomas Joseph C. Huang)
The item I mounted was the Optical Drive. I chose the 2nd slot because I was having some difficulty putting it on the 1st slot due to the wiring that was coming from the ports on the front side of the case. Mounting the Optical Drive was a very simple process, simply remove 2 screws that secure the panel slot on the front of the case and slide the drive right in, screwing it into place after. A unique thing about this case is that you also have the option to mount your drive in a sideward orientation, meaning the drive tray would be coming from the side part of your case if you choose to do so. I opted to go with the normal, front facing orientation as this was the simplest and hassle free way to go about it.


(1TB WD Caviar Black on AirMount, Photo by Thomas Joseph C. Huang)
The next item I mounted was the Hard Drive. This is another unique feature that only this specific case has. Antec uses what is trademarked as the AirMount. The AirMount is basically a hard drive mount that requires no case rails. It has detachable rails that you screw onto your hard drive and within these rails is a piece of flexible rubber tubing, something like bungee cord (one on each side) that has 2 hooks on each end. Now these hooks attach to the designated slots on case frame, thus leaving your hard drive suspended in the air, nothing surrounding it but air, hence the name. Now I know that most of you will think that is somewhat scary, it is at first, but then, after securing the hooks, the hard drive remains securely in place, there is a little play though, due to the fact that the rubber tubing is a bit long, giving the rails/hard drive some movement, if this bothers you, you can put some zip tie between on the tubing so that it doesn't move around. I opted to leave it as is because in reality, who shakes their rig around anyway? Again, you have the option to mount the hard drive in a sideward orientation or the traditional front facing orientation, which I decided to go to as well, simply because it would be easier to plug the cables. Another neat thing about this AirMount system is that it reduces vibrations and noise (not really noticeable noise because everything else is louder. Haha!) when the hard drive spins up because it won't be vibrating against any surface. Also, this system allows more airflow to keep your hard drive cool. The hard drive cage on this case has many levels (about 7), so you're free to place them wherever you see fit, I chose to keep it on the lower 4th level because it would be situated right in front of the 2 front side intake fans, this would mean optimum cooling. After mounting the Optical Drive and Hard Drive, I proceeded to connect the necessary cables used to power and operate these 2 components.

This was the easy part. Now for the more challenging aspect of this build. Cable Management.

(Successful Cable Management! Photo by Thomas Joseph C. Huang)

After connecting the PCI-e Power cords to the video card and the 24-pin ATC connector as well as the 8-pin CPU power connector and the 4-pin Molex plugs for the case fans and the front panel connectors to the PSU and motherboard respectively, we are left with a multitude of wiring (despite the PSU being a modular one) to hide behind the motherboard panel which will be shielded by a mesh exterior case. It was quite a challenge trying to get it as clean as possible, hiding cables and wires in the nooks and crannies of the case without causing any interference or blockage to any of the moving parts in the system (the fans!). This took about thirty minutes and an extra set of hands to get the panel in place while making sure no wiring was protruding or casing the panel to bulge extensively. The last step to the assembly process was to connect the 4-pin Molex plugs for the rear fan and the 2 side panel fans to the PSU, hiding the wiring accordingly before fitting the side panel back and screwing it in place. And that's it, the assembly is done!

Now the moment of truth, fire up the machine! Random moment, during my first attempt at firing up the machine, it actually didn't power on. And I was like "Oh shit!" then it hit me, the PSU power switch wasn't flipped on yet. Too much excitement caused the memory lapse. But then once the PSU switch was flipped, the rig fired up with no issues. Like a plane taking off. The Wraith (Yes, I named my PC) was alive.

Here are some photos of The Wraith. :]


(The Wraith (rear), Photo by Thomas Joseph C. Huang)
(The Wraith (front), Photo by Thomas Joseph C. Huang) 

(The Wraith In The Dark, Photo by Thomas Joseph C. Huang)
(The Wraith (side), Photo by Thomas Joseph C. Huang)

After the PC started up, the Operating System was installed and the hard drive was partitioned accordingly.

My current specs are:

CPU: AMD Phenom II X6 1100T Black Edition, currently running stock at 3.3GHz. I have yet to overclock it. >:]
Motherboard: ASRock 990FX Extreme3
GPU: Sapphire HD 6870, currently running stock at 900MHz. I have yet to overclock it as well. >:]
RAM: G. Skill Sniper 1600MHz DDR3 CL9, 1.25v, 4GB x 4 = 16GB, I have yet to overclock this too. >:]
Storage: Western Digital 1TB Caviar Black
Operating System: Windows 7 Ultimate, 64-bit
Chassis: Antect LanBoy Air
Other items:
-Logitech K260 wireless keyboard and mouse (temporary)
-Viewsonic 24" VX2439WM 1920x1080 Full HD Monitor
-Creative Inspire 5.1 A500 SBS Surround Sound System


Stay tuned for my next post to see how the system performs when using games as benchmarks as well as some regular benchmarking tools!

Also stay tuned for when I put the Antec claim of positive airflow to the test by adding 10 more fans to the current setup! 

To see the steps I took to put this machine together, check the following links in sequential order.


For Part 1, check it here: http://tomhuang03.blogspot.com/2012/06/getting-my-nerd-on-part-1.html
For Part 2, check it here: http://tomhuang03.blogspot.com/2012/06/getting-my-nerd-on-part-2.html
For Part 2.1, check it here: http://tomhuang03.blogspot.com/2012/07/getting-my-nerd-on-part-21.html
For Part 2.2, check it here: http://tomhuang03.blogspot.com/2012/07/getting-my-nerd-on-part-22.html
For Part 2.3, check it here: http://tomhuang03.blogspot.com/2012/07/getting-my-nerd-on-part-23.html
For Part 2.4, check it here: http://tomhuang03.blogspot.com/2012/08/getting-my-nerd-on-part-24.html
For Part 2.5, check it here: http://tomhuang03.blogspot.com/2012/08/getting-my-nerd-on-part-25.html

Saturday, August 18, 2012

Getting My Nerd On (Part 2.5)

This is it. The final piece is now in my possession. I was finally able to purchase the last component that I need to complete my rig. The RAM, and the reason for keeping this last was because it was more common and easier to get than the other parts that I purchased sooner. The RAM sticks that I chose originally were the Kingston HyperX Genesis Blu series, 1600MHz DDR3 CL9. However, I was struck again with the availability issues that I faced in the earlier parts of getting my parts together. So I had to make a switch. The RAM I ended up picking between was the G. Skill Ares (1600MHz DDR3 CL9, 1.5v) and the G. Skill Sniper (1600MHz DDR3 CL9, 1.25v). Both of these memory modules use low profile heat spreaders, the only difference is that the G. Skill Sniper uses a heat spreader that doesn't cover the whole stick to bring out the embossed rifle design that it has. I was looking at the 2 modules and decided to go with the Sniper simply because it was a cooler looking design in my opinion. It was just something I could resist, the combination between computers and firearms, can't get any cooler than that.


(G. Skill Sniper RAM Sticks, Photo Courtesy of Google)
To get into the more technical aspect of the RAM I chose, here are a few basic characteristics (specs taken from manufacturer website):


CAS Latency
- 9-9-9-24
Capacity 
- 8GB (4GB x2)
Speed
- DDR3-1600 (PC3 12800)
Test Voltage
- 1.25 Volts
Error Checking
- Non-ECC
Type
- 240-pin DIMM

Just to give you a short overview (based on my knowledge), CAS (Column Access Strobe) Latency or CL, refers to the time lag between the moment the memory controller signals the memory controller to access a specific area of data (usually called a memory column) on a RAM Memory Module. In layman's term, take your Memory Controller as a telephone and your RAM Memory Module as another telephone, your CAS Latency would be the number of rings it takes before someone on the other line picks up. These number of rings is referred to as a clock cycle. Now you might be wondering what "9-9-9-24" means, these numbers represent your Memory Timings and I will do my best to explain this as plainly as possible, so here it goes. To give you an example of how memory is organized, just look at it as a library. Books are arranged in rows and columns and the memory controller is the librarian. In order to get the book you want, the librarian needs the proper coordinates in order to reach that specific row and column in order to get the specific book you need.


This in order from left to right with 9-9-9-24 as an example:

1. tCL or CAS Latency- this is the time it takes the memory controller to send a signal to the RAM Memory Module to access a specific area of data. This is considered to be the most important of all the timings because it is the first step of accessing the Memory Modules. This will generally tell you how long the librarian will take to get the book you requested.
2. tRCD or Row Address Strobe (RAS) to Column Address Strobe (CAS) Delay- Once the memory controller sends the "coordinates" of the requested memory, this is the time it would take before it gets to the area of selected data. This will tell you how long it will take for the librarian to get to the book from a specified section of the library.
3. tRP or Row Precharge Time- Once the memory controller reaches the specified area of the requested memory, this is the time it will take to access that area of requested memory. This is the time it will take for the librarian to pick the book out of the shelf.
4. tRAS or Row Active Time- This is the number of cycles that a row has to remain active to ensure that the memory controller will have enough time to access the information that is in a specified area. This is the time that the librarian has to get to the area of the library where your book is located, pick that book out and bring it back to you before you get impatient and just leave the library.


(G. Skill Sniper RAM, Photo Courtesy of Thomas Joseph C. Huang)
I hope that my brief explanation was sufficient enough to give a general understanding of RAM Timings as these will play a role in terms of overclocking your RAM.

 Now that the final piece is in possession, it is time to put everything together. Stay tuned for Part 3 of this Getting My Nerd On series!


For Part 1, check it here: http://tomhuang03.blogspot.com/2012/06/getting-my-nerd-on-part-1.html
For Part 2, check it here: http://tomhuang03.blogspot.com/2012/06/getting-my-nerd-on-part-2.html
For Part 2.1, check it here: http://tomhuang03.blogspot.com/2012/07/getting-my-nerd-on-part-21.html
For Part 2.2, check it here: http://tomhuang03.blogspot.com/2012/07/getting-my-nerd-on-part-22.html
For Part 2.3, check it here: http://tomhuang03.blogspot.com/2012/07/getting-my-nerd-on-part-23.html
For Part 2.4, check it here: http://tomhuang03.blogspot.com/2012/08/getting-my-nerd-on-part-24.html

Wednesday, August 1, 2012

Getting My Nerd On (Part 2.4)

While browsing through my Facebook feed, I came across a post by PCHub, they were having a promo for the Antec LanBoy Air case, it was originally priced at 8,640 bucks (PhP) which is approximately $206 (USD) based on today's exchange rate and the promo mentions a 50% discount which cuts the price down to 4,320 bucks (PhP) which is about $103 (USD). My eyes lit up at seeing this huge price drop so I decided to give them a call, unfortunately, the case was already sold out. Before giving up hope, I checked PCNetmiles (which is nearer to me and more accessible) to see if they were selling the case as well and to my surprise, they too were on sale! Their original selling price was 8,800 (PhP) which is around $210 (USD) and they dropped the price to 4,300 (PhP) which is around $102. This deal was too good to pass up for the following reasons and to explain this I will quote my good friend Martin: "One, it's an Antec. Two, the price.". When this case was first released and after seeing the promotional demonstration as well as the video and written reviews, I was sold. However, what held me back was the original price which was way over my budget. The case that I had in mind in place of the Antec LanBoy Air was the Cougar Evolution, because of the features it presented as well as its price (4,000 Php or $95). But then this deal became the game-changer, because the price drop fell right onto my budget range which is 4,000-5,000 (PhP) or $95-$120 (USD) and on top of that, this was the case I had originally wanted. My plan was to get the case as the last part but this was an unexpected opportunity that I could not pass up. Only downside was the blue one was no longer in stock, so I chose the red instead. Now I know how women feel when their favorite stores go on sale. Haha!


(Antec LanBoy Air, Photo courtesy of Antec.com)
Now getting into the case itself, if you take a look at the photo provided on their website, it's easy to see that this case is truly out of the ordinary, it's like nothing else on the case market as far as I've seen, it actually reminds of a Transformer (especially when you choose the yellow one, which reminds me of Bumblebee, it comes in blue and red by the way). As the label on the photo says, it is a Modular case. This means that almost every panel on this case can be removed and shifted to at least one new location if desired, this also includes the motherboard tray as well as the Power Supply cage. This case can support up to 15 120mm fans, that's a huge number compared to the other cases on the market today. Antec was kind enough to provide their customers with 5 case fans right out of the box, 2 TwoCool LED fans in the front panel (these both have variable speed stepless control knobs), 2 TwoCool LED fans on the side panel and 1 TwoCool fan in the back. One of the things that made me hesitate buying this case was the fact there are not dust filters whatsoever and to me this spelled "Dust Trap" right off the bat, but after doing some reading, the case is designed to generate positive pressure if you configure your fans correctly, Antec claims that this positive air pressure will blowout hot air and dust throughout the panel perforations of the case where there is no airflow involved. Once my setup is complete, I will put definitely put this claim to the test. You have some of the basic front panel port configurations, 2 USB 2.0 ports, Audio In and Out as well as 1 USB 3.0 port.


Another unique thing about this is case is the way you mount the Hard Drives, Antec uses what they call AirMounts which pretty much means that your 3.5" (the case can hold 6) are suspended in midair held by small bungee type cords that hook onto the case, don't worry, they are secure enough unless you do something foolish during installation and to add the concept of customization or "modularity", you can mount the in 3 different directions based on what suits you, of course this isn't a senseless concept, the reason behind this is that this setup reduces vibrations and reduces noise. You also have 2 internal 2.5" SSD bays at the base of the case. And on top of that, you also have the ability to rotate your 5.25" drives which add to the multitude of customizations you could do with this case. The case also comes with flip up carry handles for easy transportation of your rig in the event of a LAN Party or whatnot, hence the name LanBoy. Based on the photos, the case looks pretty flimsy but having handled the case in person, it is the complete opposite, it is a pretty solid case, it's well constructed and sturdy, weighing in at about 20lbs on its own. Once I begin my assembly, I will write about it so that everyone can get an idea regarding the ease or difficulty that is involved when putting the rig together in this case.


Looking back at my checklist, I just need my RAM and I'm set to put it all together. I can smell the completion of my rig getting closer.


(Antec LanBoy Air, Photo courtesy of Antec.com
Thank you PCNetmiles for my case and for the quick and easy transaction as usual! And thank you Janine, my awesome girlfriend for helping solidify my decision in terms of color choice!


Stay tuned for my next post which will essentially end Part 2 of this series which will allow me to move on to Part 3 which is putting everything together.


For Part 1, check it here: http://tomhuang03.blogspot.com/2012/06/getting-my-nerd-on-part-1.html
For Part 2, check it here: http://tomhuang03.blogspot.com/2012/06/getting-my-nerd-on-part-2.html
For Part 2.1, check it here: http://tomhuang03.blogspot.com/2012/07/getting-my-nerd-on-part-21.html
For Part 2.2, check it here: http://tomhuang03.blogspot.com/2012/07/getting-my-nerd-on-part-22.html
For Part 2.3, check it here: http://tomhuang03.blogspot.com/2012/07/getting-my-nerd-on-part-23.html


Tuesday, July 31, 2012

Getting My Nerd On (Part 2.3)

(Western Digital Caviar Black, photo by Thomas Joseph C. Huang)
Last week, I managed to produce for myself some extra cash by selling a few items online.  This led me to take a look at my Rig Building Checklist and what do you know, there is a component that falls right into the price range of the cash I have on hand. And this component was my Hard Drive. The Hard Drive I have selected is the Western Digital 1TB Black Caviar. This is a 3.5" Dual Processor Internal Hard Drive that spins at 7,200 RPM with 64MB of cache memory. This model is 1 of the 3 Caviar series of Western Digital (The 3 models are Caviar Black, Caviar Blue and Caviar Green). So now, you may be asking yourself, "What's the difference between them all?", don't worry, I've asked myself that question as well. Now I did some digging and I found some basic items that may answer your questions. The Caviar Black series is the top of the bunch (for the Caviar Series) in terms of power and performance. The Caviar Black has been optimized for performance but with this optimized performance comes higher power consumption and noise, however this noise may be negligible when it comes to overall Rig noise as it isn't the only component generating noise. The Caviar Blue is the marketed to be the perfect balance between power consumption and performance, spinning also at 7,200 RPM but has less cache memory than the Caviar Black and lastly, the Caviar Green is designed to be the most power efficient and quiet of the three at the expense of performance. The Caviar Green does not have a fixed speed as opposed to the Caviar Black and Blue, it runs on what Western Digital calls "IntelliPower" and based on my understanding, this means that the speed varies depending on drive usage and when not in use, the drive does not spin up thus saving power, did some research too and the speeds of the Caviar Green are in the range of 5,400-5,900 RPM. All three drives are SATA3 though.


I chose the Caviar Black series simply because I didn't want to take any chances when it came to the overall performance of my system. Once I put everything together, we shall see how it performs.


Thank you to my girlfriend for her endless support and patience, I love you! And thank you PCHub for my Hard Drive and for the great service!


Stay tuned for the next part of this series! I have 2 components left before the completion of my main system! (Not including the Monitor, Mouse, Keyboard and Speaker System)


For Part 1, check it here: http://tomhuang03.blogspot.com/2012/06/getting-my-nerd-on-part-1.html
For Part 2, check it here: http://tomhuang03.blogspot.com/2012/06/getting-my-nerd-on-part-2.html
For Part 2.1, check it here: http://tomhuang03.blogspot.com/2012/07/getting-my-nerd-on-part-21.html
For Part 2.2, check it here: http://tomhuang03.blogspot.com/2012/07/getting-my-nerd-on-part-22.html

Tuesday, July 24, 2012

The Revival Project: The Overhaul

In a previous post ( http://tomhuang03.blogspot.com/2012/06/amd-duron-850mhz-spitfire-my-first.html ), I discussed my very first overclocking attempt using my old rig. I mentioned that I will be gathering benchmarking tools and run some tests on the said system, I now have those tools, however, I encountered a problem with my old system. I tried powering it up and the Hard Disk Drive was no longer recognized by the motherboard or in the BIOS. My first thought was to blame the Hard Disk Drive (Seagate 40GB IDE) so I decided to isolate, I bought a Hard Disk enclosure (IDE to USB interface) and tested it on my laptop, the Hard Disk reads without any hiccups, therefore I concluded that it isn't the Hard Drive, I switched IDE Cables as well and the motherboard still won't recognize it, therefore, I have come to the conclusion that the failure comes from the motherboard itself, the IDE port is no longer functioning. To resolve the issue, I went in search of a Socket A 462 Motherboard. This was no easy task as this type of hardware is about 10 years old already. But fortunately enough, using a Philippines based website called TipidPC.com, I posted what I needed at the Want To Buy section and luckily, I was able to receive a text message offering a secondhand motherboard, an MSI KM2M Combo motherboard for 900 bucks (PhP).


Now the "surgery" begins.

(AMD Duron 850 and heatsink, Photo by Thomas Joseph C. Huang)
(CPU with new Thermal Paste, Photo by Thomas Joseph C. Huang)
(Proper Alignment, photo taken from AMD Support Website)
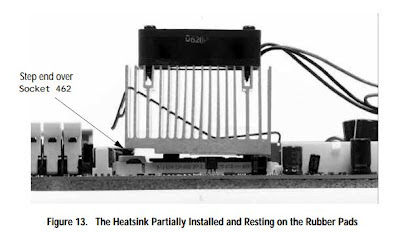
First off, I made sure that nothing was connected to any power wall outlets. After, I made sure to touch my set of dumbbells to discharge any static electricity (I wear a silver bracelet, but better safe than sorry.) then I proceeded to removing the side panel of the case. After removing all the cables connected the motherboard, I unmounted the PSU because it was in the way of getting to the CPU area of the motherboard. After setting the PSU aside, I freed the CPU cooler (standard heatsink with fan) and set that aside, after which, unclamped the CPU and removed the processor and set that aside too. Looking at the processor and the heatsink fan, it was covered in dust and the used thermal paste. I cleaned off the dust using rubbing alcohol and cotton buds, I repeated this process until the bottom of the Heat sink and the top of the CPU were free from thermal paste. I also cleaned off all the dust on the heatsink and the fan. Once cleaned, I mounted the processor onto the socket of the new motherboard. Then I put some new thermal paste, about the size of a grain of rice onto the center of the CPU chip (the small square in the middle of the bigger square). I used Deep Cool Z3 thermal paste, it's priced quite cheaply and works well in terms of thermal conductivity that aids in heat dissipation and comes in the easy to use syringe. Once the new thermal paste was applied, I then reattached the heatsink and fan. Just a little tip when reattaching the heatsink, you need to make sure that the the alignment is correct, meaning that the stepped area on the base of the heatsink is properly aligned with the socket. (refer to the photo labeled Proper Alignement, taken from http://support.amd.com/us/Processor_TechDocs/23986.pdf), you may also need to use a flat head screwdriver to ease the the heatsink clip into place, by using this method, you don't apply any direct force onto the CPU which may cause damage.
(CPU in place, Photo by Thomas Joseph C. Huang) 


Now that CPU is in place, I inserted the PC133 RAM into the RAM slot, then I connected all the necessary wires to their corresponding locations on the motherboard. I also connected the hard disk drive to the corresponding IDE port on the motherboard as well.


(All wired in, Photo by Thomas Joseph C. Huang)
Now that everything is in place, I plugged in the power supply to the wall socket and turned on the monitor. Then, the moment of truth! I pushed the power button.


Nothing. Happened. No beeps. No monitor display output. I double checked all the wiring connections, checked the internet for some troubleshooting tips and asked a few friends for advice as well.


Apparently, due to my excitement, I hadn't noticed that the current power supply (it's a generic one, a mere 235w PSU) I was using didn't have the 4-pin 12v power connector, it seems that the previous motherboard I was using didn't require this connector to power up the CPU, hence it's absence. This board is of "newer technology" so to speak. So I thought of a quick solution, find another generic power supply unit that is equipped with a 4-pin 12v power connector. And luckily, I found one from one of the stores (PCNetmiles to be exact) I mentioned in part 2 of the Getting My Nerd On series, as usual, a quick and hassle free transaction yielded me to purchasing a generic 600w PSU for 590 bucks (PhP). I also stopped by another store for 2pcs of 256MB PC133 RAM (secondhand) to replace the current 128MB PC133 RAM, I got these at a price of PhP280 for both. Not a bad way to spend 870 bucks (PhP).

Unfortunately, I got a lemon when it came to the PSU I first bought, it wouldn't power up at all. Tried unwiring and rewiring and on a different motherboard and still no power. But PCNetmiles is a very reasonable shop and replaced the PSU right away, no questions asked. However, there seems to be a deeper issue. After being all wired in, I proceeded with turning on the PC. CPU fan spun normally, hard drive was running as well, but all I got was a gray-like display on the screen, but nothing else. No beeps either, despite having the system speaker front panel connector in place. I searched the net and found this nice checklist from Tom's Hardware (see link below), I will run through it and see if the problem gets resolved throughout any point of the list.

Link: http://www.tomshardware.com/forum/261145-31-perform-steps-posting-post-boot-video-problems

Hope that somewhere through this checklist, the problem will be resolved.

Sunday, July 15, 2012

Getting My Nerd On (Part 2.2)

Today (July 13) is payday, fortunately for me, this payday also included our annual performance bonus. In short, more money. This granted me the wonderful opportunity to purchase another part for my rig without going hungry until the next paycheck. Haha. So again, I referred to my build checklist and decided to get my Video Card/Graphics Processing Unit. Now Graphics Processing Unit or GPU could turn out to be one of the priciest aspects of your rig (depending on the goals of the said rig of course) but if you're like me, who wants to get some decent gaming done on his/her rig, then it would be wise to pick a card that suits your needs and budget. The card I have chosen doesn't essentially fall under the high end category in terms of performance, but it should get the job done, in terms of quality of game playing. And price wise, it falls under a generally moderate range (in PhP). Because it's higher priced relatives offer almost the same performance output but for an exuberant price. This observation is a fruit of my research when finding alternatives or back ups in the event of item unavailability. To all the nVidia users out there, I am not waging any wars, it's just personal preference! :]


The card I have selected was initially the PowerColor HD 6870, but due to the seemingly unending availability issues I've been encountering during this build, I went for the Sapphire HD 6870 instead, which is about 20 bucks (PhP) more expensive than its PowerColor variant. I was able to stick with my card of choice though, which is a good thing despite switching brands. And as always, I did my research before making the switch, I've read a lot of good things about Sapphire, but of course, I don't take it all on reading, watch some test videos and finally, I'll see for myself once the build is complete.

A short overview of it's specifications:

GPU900 MHz Core Clock
Memory

Power Requirement
1GB
256 -bit GDDR5

500W PSU required


(Sapphire Radeon HD 6870, Photo taken by Thomas Joseph C. Huang)


I paid a visit to Gilmore IT Center once again (mentioned in Part 2: http://tomhuang03.blogspot.com/2012/06/getting-my-nerd-on-part-2.html), took my ever supportive girlfriend with me and headed straight for a shop called PCHub (I headed straight for this shop because I did my canvassing and availability checks prior to the visit (very useful tip when building your own rig, saves you a lot of trouble.) Dealing with the people in this shop is a very pleasant experience, they are very accommodating and the way they relate to customers is very professional and friendly. One thing I liked too is that after you make your purchase, you are offered to test what you just bought, an option that I took to assure that the video card I bought is working, which thankfully it is.

Having purchased this part, this puts me at about 60% completion based on my checklist. The only items left are the following: RAM Sticks, Internal Hard Drive and a chassis.

Just wanted to update everybody on the progress of my build!

(Me and the GPU!, Photo courtesy of Janine Lyn David)
Thank you PCHub for the awesome service and for the video card!


Stay tuned for the next part of the Getting My Nerd On series as I continue my quest for the completion of my rig!


For Part 1, check it here: http://tomhuang03.blogspot.com/2012/06/getting-my-nerd-on-part-1.html
For Part 2, check it here: http://tomhuang03.blogspot.com/2012/06/getting-my-nerd-on-part-2.html
For Part 2.1, check it here: http://tomhuang03.blogspot.com/2012/07/getting-my-nerd-on-part-21.html